Most DBA’s do not mind working on the command line or shell. But there are database architects, developers and DBA’s who prefer a visual tool. If you are one of them, you will want to use a MySQL workbench download. This unified visual tool allows you to model data, develop SQL and features comprehensive administration tools that ease server configuration including user administration and backups.
It is available for multiple platforms namely Mac OS X, Windows, and Linux. In this post, we look at how to install a MySQL workbench on a Mac.
Downloading MySQL Workbench

The process for downloading and installing MySQL Workbench is pretty straightforward. The first step is visiting the MySQL website and heading to downloads. On the downloads page, scroll to the bottom of the page and click on the Community (GPL) Downloads under MySQL Community Edition.
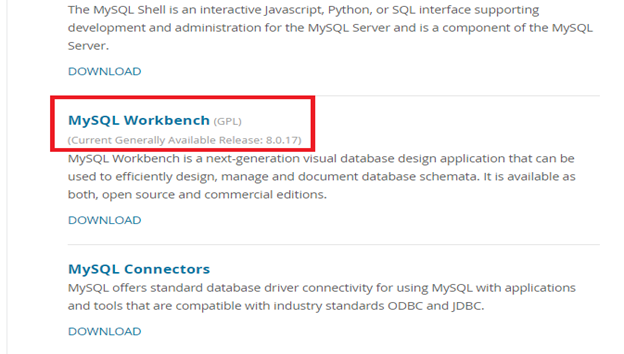
On the next page, scroll to the middle of the page and find the MySQL Workbench link and click on it.
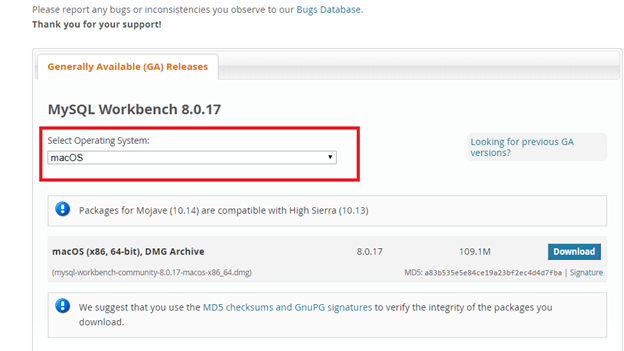
On the next page, scroll to the bottom and hit the download button. Generally, the website picks up your operating system and gives you the option to download it. But, on rare occasions, you will have to select the operating system manually if yours does not register automatically.
Once you confirm your MySQL workbench is set for the appropriate operating system hit the download button which takes you to another page. On this last page, you will be prompted to either log in using your oracle web account or sign up for an oracle web account if you don’t have one. However, you do not have to do either as you can automatically start your download for MySQL workbench without signing up.
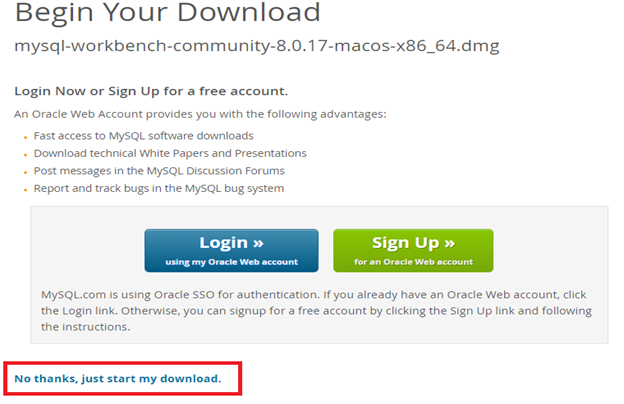
At the bottom of the page, click on “No thanks, just start my download”. Once your MySQL workbench download Mac is complete, you only need to double click on it to start the installation.
MySQL Workbench Installation

On double-clicking on the download, you will get a pop-up window from where you will drag the MySQL workbench icon to the Applications folder to start the installation.
Once the installation is complete, look for MySQL workbench in your Launchpad and you are ready to start using the tool.Now that you have installed MySQL workbench on your Mac, you only need to ascertain it works by creating a connection. To do this, open MySQL workbench and click on the plus sign next to MySQL connections.In the connection settings window, enter the name of the connection and the method (TCP/IP is the standard connection method). Change the port to 3307 and start by creating a database schema.Once that is done, hit the Test Connection button to check whether the connection is working.
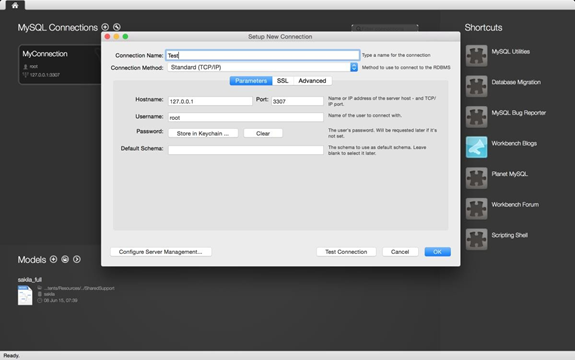
This will prompt for the root password which is the password you set when installing the server. If you did not set a root password, you can click on okay to proceed. A successful connection will show a success message while a failed one will show a failure message.If successful, the connection will show up in the MySQL connections section of Workbench.A connection failure signifies a problem with the server and often, if the connection fails, the server might not be running. To confirm whether the server is running, head to system preferences -> MySQL and check the server status which should be running.If it is not running, then you will need to restart it and try connecting again.