Every software project requires a method to monitor and organize the work that must be done. To-do lists in one-man hobby projects to professional issue trackers in massive codebases with hundreds of maintainers are all tools for this.
Large open-source projects utilize issue trackers in various ways: some use specific issue-tracking platforms like Jira (Open edX, Swift, OpenMRS), YouTrack (Kotlin), or Trac (Django), while the majority use GitHub Issues.
What is GitHub Issues?
GitHub Issues is a lightweight issue-tracking system found in all GitHub repositories. When you establish a GitHub repo, you receive GitHub Issues out of the box, and you almost always continue to use it as your project matures.
GitHub Issues is often used to report issues and request functionality. It may hold discussions, assist in the processing of support requests, or even offer documentation feedback.
If you wish to utilize GitHub Problems with your repository for a long period while being productive, consider the fundamental issue tracker management procedures outlined below.
This article shows how to use GitHub Issues to plan and track a project. You will create a new issue and add a task list to manage sub-tasks in this guide. You'll also learn how to add labels, milestones, assignees, and projects to your issue to express metadata. Labels are a great way to categorize issues, allowing you to group them together by topic or type. For example, you could add labels like “bug” or “feature request” to your issues.
Prerequisites
To create an issue, you need a repository. You can use an existing repository that you have write access to, or you can create a new repository. The repository must have issues enabled.
Making and Opening a blank issue
Create an issue first. There are several methods to create an issue; you may select the one that is most suitable for your workflow. The GitHub UI will be used in this example.
Navigate to the repository's home page on GitHub.com.
Click Issues under the name of your repository.
Select New issue.
We'll begin with a blank issue in this case. To encourage contributors to offer precise information, your repository may employ issue templates and issue forms. Click Open a blank issue if your repository supports issue templates.
Markdown may be used to add formatting, links, emoticons, and more.
Adding a task list
It can be beneficial to divide major problems into smaller jobs or to monitor numerous linked concerns inside a single larger problem. By prefacing the list of things with [], you may add a task list to your problem. Existing issues may be found by using the issue number or URL. You may monitor tasks that don't have a matching problem in plain text and convert them to issues later. This is a wonderful approach to keeping track of all the chores you need to perform, even if they aren't related to a single issue. You may quickly construct a list of tasks in plain text and convert them to problems as needed. This is a great way to organize your work and keep track of what needs to be done.
Adding labels
To classify your problem, add a label. For example, you might use a problem label and an excellent first issue label to signal that an issue is a bug that a new contributor would notice. Users may filter issues by label to find all issues with that label. This is an excellent technique to organize and manage activities since it allows users to look for issues that have been labeled with a certain label fast and efficiently. Labels can be used to categorize tasks according to their type, priority, or any other criteria that may be important to the user. Labels are a great way to organize tasks, as they allow users to quickly identify items that need to be completed. For example, a user may assign a label of “high priority” to tasks that require immediate attention. This can help them prioritize their workload and ensure that the most important tasks are completed first. Additionally, it can be helpful to break down large tasks into smaller, more manageable chunks.
You can use the default labels, or you can create a new label.
Adding milestones
You can add a milestone to track the issue as part of a date-based target. A milestone will show the progress of the issues as the target date approaches. Milestones are an important part of any project, as they provide a way to measure progress and ensure that the project is on track. Milestones can be used to break up a larger project into smaller, more manageable tasks, and they can also be used to help you stay organized and on track. To-do lists are an invaluable tool for any project, big or small. They provide a clear roadmap of what needs to be done and when, allowing you to focus on the task at hand and stay organized. This will help you to break down your project into manageable chunks and set achievable goals.
Assigning the issue
To communicate responsibility, you can assign the issue to a member of your organization. This feature allows you to assign a specific issue or pull a request to a particular user, giving them the responsibility of addressing the issue or request. This is especially useful when you have a large team and need to delegate tasks. It also allows you to assign tasks to individual team members, track progress, and ensure that everyone is on the same page. This makes it easier to manage a larger team and keep everyone focused on the same goals. With a task management system, you can assign tasks to team members
Adding the issue to a project
You can add the issue to an existing project and populate metadata for the project. For more information about projects, see "About projects.
Submitting your issue
To create your issue, click Submit new issue. After you've created the problem, you may change any of the above fields. Your issue has its own URL, which you can share with team members or use to reference in other issues or pull requests.
Communicating
After your issue is created, continue the conversation by adding comments to the issue. You can @mention collaborators or teams to draw their attention to a comment. To link related issues in the same repository, you can type # followed by part of the issue title and then click the issue that you want to link. This is a great way to quickly and easily link issues together, making it easier to keep track of the progress of each issue. It is also a great way to quickly refer back to an issue that may have been discussed previously. This feature is especially useful when working in a team setting, as it allows everyone to keep track of the conversations they have had and the decisions that have been made. It can also be used to quickly review any topics that may have been discussed in the past so that everyone is on the same page. This is especially useful for large groups or teams, as it can help to ensure that everyone is up to date on the same information. Additionally, it can be used to review topics that may have been discussed in the past, to ensure that everyone is on the same page and that all members of the team are up to date. This can be especially useful in a large organization, where different departments may have different interpretations of the same data.
Next steps
You can use issues for a wide range of purposes. For example:
- Tracking ideas
- Collecting feedback
- Planning tasks
- Reporting bugs
here are some great practices that you can employ when utilizing the GitHub Issues to make it more seamless and smooth
Go With the Defaults
If your repository is fresh and new, you don't have many issues reported, and you want to let all types and forms of feedback pour through, then leave the GitHub Issues settings alone.
You will be able to freely connect with users without limiting what they may report, and you will be able to conduct informative dialogues that may or may not be actionable. This might be a fantastic idea in the early phases of your business when you're still figuring out who your users are and what difficulties they're having.
If you choose this route, be prepared for a lot of back-and-forths with your reporters, and don't forget to look over old issues and close them every now and again.
As your user base expands, so does issue traffic in your repository, and you may begin to question if your reporting routine needs to be more consciously planned. Check out the following techniques if you believe you've reached a new degree of maturity.
Encourage Search and Avoid Duplication
Encourage reporters to look for already published issues before submitting new ones. This saves everyone time. If a similar problem exists:
The reporter can obtain an update on the status of this issue, learn about workarounds that other impacted customers or the project team may have detailed, and avoid spending time detailing the problem. Simply upvoting a previously reported problem would suffice.
Project administrators can save time by triaging complaints and having all relevant user comments that can guide their work on a specific problem in one location.
As you input the description of a new issue, certain issue trackers scan for probable duplication.
GitHub, however, does not do this. You can't really compel users to search before reporting, and you'll still need to triage and check for duplicates, but simply asking can help.
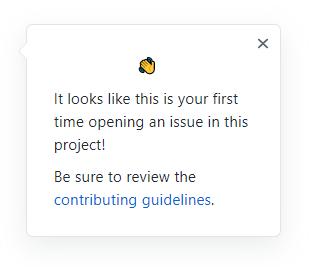
So, how should people be asked to search before submitting? The answer is contributing guidelines on GitHub.
Simply write a document at the root of your repository called CONTRIBUTING.md, define your preferred issue reporting method, and underline the need of looking for existing issues before contributing anything new. Feel free to draw inspiration from current repositories' rules.
When your repository has contributing guidelines in place, a visible overlay with a link to contributor guidelines appears every time a new user attempts to file their first issue. This is an important step in the process of getting involved with the project, as it helps to ensure that the user is aware of the expectations and standards for the project. By providing a link to the contributor guidelines, it allows the user to quickly and easily access the information they need to understand the expectations and requirements of the project. This is especially helpful for those who are new to the project, as it provides a clear and concise overview of the rules and regulations that must be followed.
Adding Structure and Promoting Reporters to be Specific with Issue Reporting
There is only one way to make a feature request. There is another way to report an issue. Discussions and assistance requests are either welcome or not on your issue tracker.
As your repository receives more issue reports, you must define what kind of issues you are willing to accept and what information you want them to contain. GitHub Issues provides issue templates to assist you with this.
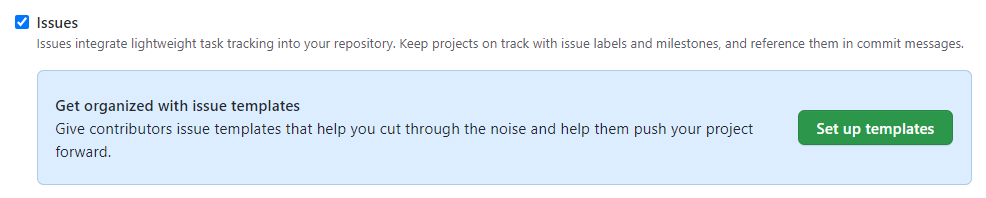
To begin, utilize GitHub's template builder to create standard bug and feature reporting templates:
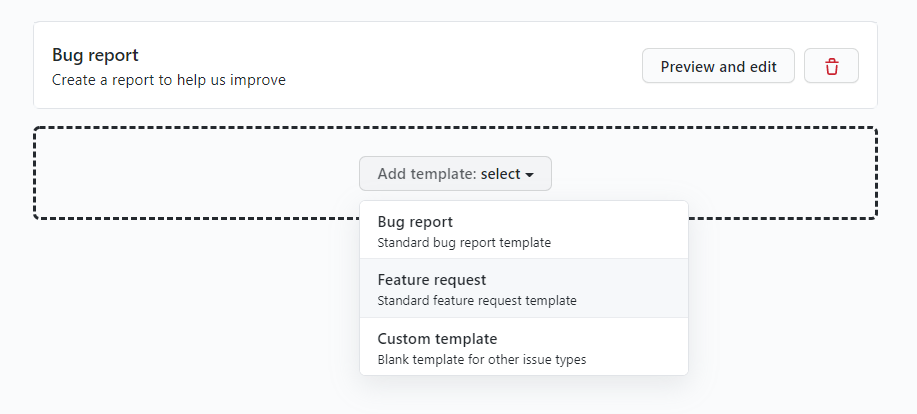
After you've configured the basic templates, click New Issue. Instead of a standard issue form, you'll be taken to the template chooser, which asks you to select a specific type of issue. When you click Get started to generate a bug report, the issue form will be pre-populated using the standard bug report template that you've just defined on GitHub.
You may now change GitHub's default issue templates and add new templates to meet the needs of your team. To do this, either utilize the template builder mentioned above or manually update template files. Issue template files are YAML files that are located in the .github/ISSUE TEMPLATE folder of your repository:
You may modify the template chooser view even more by adding a config.yml file to the .github/ISSUE TEMPLATE folder. This allows you to perform two things:
- Require reporters to utilize the specified problem formats rather than just recommending them.
- Reporters should be directed to external sites for actions that your issue tracker does not permit, such as filing support requests, obtaining community support, or even sending bug reports to your organization's other repositories.
Route Vulnerability Reports
Code vulnerabilities are unavoidable. Normally, you aim to discover and address vulnerabilities internally, however vulnerability reports from external users sometimes occur.
When this occurs, you normally do not want them to be made public since it would leave you with little time to investigate and take action. Instead, it is standard practice to create a distinct reporting method for responsible disclosure, in which the vulnerability is confidentially reported to the vendor and not publicly published until the vendor has produced a fix.
Here's how the React repository, for example, provides a different protocol for reporting vulnerabilities:

Use Labels
Labels are an excellent approach to categorizing issues and dividing your team's workload into reasonable chunks. Labels are a very versatile tool that can address a variety of difficulties since they may be applied to any given situation. Here are a few examples:
- Divide the project into areas of responsibility. Depending on your application's design, you may wish to utilize labels for particular components or subsystems. Labels can be used to help identify the purpose of a component or subsystem, as well as to help make it easier to identify and track its performance.
- Mark concerns that have not been prioritized. If your team wants to triage each new problem, you may utilize issue templates to attach a particular label (for example, triage) to each new issue. A person in charge of triaging issues would then need to look for all issues with this label and delete it as they handle the concerns. When a search for triage issues yields no results, it signifies that all issues have been correctly triaged. This is a critical step in the process of managing a project, as it allows the team to prioritize tasks and allocate resources accordingly. Without triage, the team may be overwhelmed by the sheer number of tasks and lack the ability to focus on the most important tasks.
- Isolate concerns that require further information from the reporting. If an issue lacks the specifics required to be actionable, you can request the details from the reporter and provide a special label, such as needs more information. If the reporter fails to supply details within a certain time range, you might mark the request as incomplete. This is a crucial step in the process since it guarantees that all requests are met on schedule. Without a deadline, reporters may take too long to supply the essential information, causing the entire process to be delayed.
- Make a list of issues that are open to outside contributions. For this aim, labels such as good initial issue and help requested are commonly utilized. This helps to ensure that the project is open to any and all contributions from the public. It also helps to create a sense of community and collaboration, as it allows people from all walks of life to contribute to the project in meaningful ways. Additionally, it provides an opportunity for individuals to learn from each other and to grow together as a team. Collaboration encourages creativity and innovation, as it allows people to share ideas and to think outside the box. It also helps to break down barriers.
When you set up your repository, GitHub will create a default set of issues:

You can keep the default settings alone or alter them. You could, for example, wish to:
- Prefixes can be used to indicate the type of characteristics that a label conveys. You might use type: bug and type: enhancement instead of bug and enhancement. Use state: invalid and state: duplicate instead of invalid and duplicate. When you select a label to set, this helps users understand what alternatives are available for each type of property. This label naming technique is utilized at freeCodeCamp, one of the largest GitHub projects.
- Use the same colors on all labels of the same kind. For example, you might make all type: n labels light green (which you'll want to see while browsing issues) and all state: n labels light gray.
As a general rule, don’t use too many labels. Browsing a list of issues with each issue decorated with five to ten colored labels is hard on your eyes and bad for your focus. It will then turn into a mess and you'll lose track of what are the most important issues when you overuse your labels, so use them not sparingly, but wisely!
Mention the Appropriate People
Mention additional people if you wish to leverage their skills, get an estimate from them, or simply be aware of an issue. GitHub, like Twitter and Facebook, allows you to mention people and whole teams using the @username syntax. Consider the following when adding mentions:
- Because every mention results in an email message to the person being mentioned, try to mention only when necessary.
- When referencing a user who was previously not involved in an issue, make it clear if you want them to take action or if you're simply informing them of what's going on.
Choose a Workflow to Assign Issues to Developers
It's a good idea to assign problems to individual developers. However, how developers should be allocated is determined on the visibility and usage of your repository:
- If your repository is private and you don't anticipate anyone from other departments to report issues, you can agree to assign assignees as soon as new issues are created. This strategy works as long as every potential reporter is aware of which developers should tackle particular concerns.
- You can't expect external users to know which developers should be allocated to their issues if your repository is open to the public. In this instance, it's best to leave new issues unassigned and have someone on your team examine them on a frequent basis.
Close Issues After it's Resolved
One significant anti-pattern in issue tracking is keeping an issue open after the claimed problem has been resolved. When this occurs, consumers are ignorant of the adjustments they requested. And for developers, each more open problem makes deciding what to do next more difficult.
Closes #issue number is a custom syntax that auto-closes issues from pull request descriptions and commit messages. When you use this approach, GitHub automatically closes the relevant issue after the commit is published (or PR is merged) into the main branch (s). Closes #1, resolves #13, for example, if your commit addresses problems 1 and 13.
Backing up GitHub Issues
If GitHub Issues are a key part of your development workflow, you should back them up on a regular basis. While there are several basic, free programs available to assist you with backing up your Git repositories, most just back up the code and do not include issues or other information. You will very certainly have to execute these scripts manually.
Summary
GitHub Issues is a simple yet effective problem tracker. Although it does not have the capabilities of dedicated solutions like Jira or YouTrack, it does allow you to establish a somewhat scalable structure for problem reporting and management.
Remember that a badly maintained issue tracker may soon devolve into a jumble of spotty, incomplete reports that leave developers unsure what to do next and disrupt user contact. A well-maintained issue tracker, on the other hand, reduces confusion and gives the development team with unambiguous user input that is easy to prioritize and act on.